山本ワールド
VirtualBoxにFedora18,19をインストールし共有フォルダを使用する

初版 2013/07/14
Fedora19への対応 2013/11/02
全面刷新 2013/11/16
VBOXASDDTIONSのフォルダー名を自動判別 2013/12/08
概要
Windows側に共有フォルダを準備後、Virtualboxで設定する
以後、Windows上のC:\linuxを共有フォルダーを例に説明する。
VirtualBox マネージャーの設定で共有フォルダー名と共有するWindows側のフォルダー名を設定する。
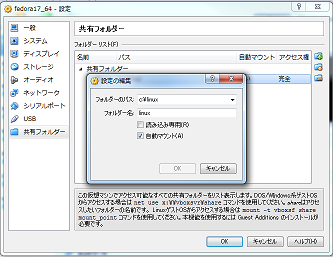
フォルダーパスにC:\linux
フォルダー名にlinuxを設定
VirtualBox マネージャーの設定で共有フォルダー名と共有するWindows側のフォルダー名を設定する。
フォルダーパスにC:\linux
フォルダー名にlinuxを設定
Guest Additionsをインストールする
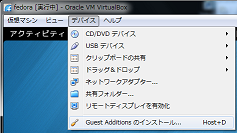
ゲストOSを起動しデバイスメニューのGuest Additionsをインストールを選択する。
Verifying archive integrity... All good.
Uncompressing VirtualBox 4.2.12 Guest Additions for Linux............
VirtualBox Guest Additions installer
Copying additional installer modules ...
Installing additional modules ...
Removing existing VirtualBox non-DKMS kernel modules       [  OK  ]
Building the VirtualBox Guest Additions kernel modules
The gcc utility was not found. If the following module compilation fails then
this could be the reason and you should try installing it.

The headers for the current running kernel were not found. If the following
module compilation fails then this could be the reason.
The missing package can be probably installed with
yum install kernel-devel-3.9.4-200.fc18.i686

Building the main Guest Additions module                   [失敗]
(Look at /var/log/vboxadd-install.log to find out what went wrong)
Doing non-kernel setup of the Guest Additions              [  OK  ]
Installing the Window System drivers
Installing X.Org Server 1.13 modules                       [  OK  ]
Setting up the Window System to use the Guest Additions    [  OK  ]
You may need to restart the hal service and the Window System (or just restart
the guest system) to enable the Guest Additions.

Installing graphics libraries and desktop services componen[  OK  ]
Press Return to close this window...
Guest Additionsをインストールが失敗した場合
上記の様に実行時にエラーおよび失敗が発生した場合、gcc等のインストールを実施した後、Guest Additionsを再度インストールする。システムのアップデートにより共有機能が使えなくなるときがあるので設定が楽になるようにシェルスクリプトで記述し実行する例も示す。
実行には端末を起動してroot権限を取得する必要がある。(端末上でsu -を実行)
2013/11/16の記述では「先ほどのVBOX・・・フォルダー名とa3.shに記述されているフォルダー名を比較し違いがあればa3.shを修正する。」と記載していましたが、今回はスクリプトを修正してフォルダー名を自動に認識するようにしました。a3.shの`ls`はlsコマンドの実行結果を参照しなさいという意味です。`はshiftを押しながら@を押して入力します。
a3.shの引数にユーザー名を記述して実行。ユーザー名はVBOXASDDTIONSをマウントしたユーザー名である。
a2.sh
a3.sh(2013/12/08修正)
a4.sh
実行には端末を起動してroot権限を取得する必要がある。(端末上でsu -を実行)
スクリプトを使用せずに更新
yum -y install kernel-headers kernel-devel gcc更新されたパッケージがあれば再起動する。
yum update更新されたパッケージがあれば再起動する。
export KERN_DIR=/usr/src/kernels/`uname -r`
/run/media/ユーザー名/VBOXADDITIONS_4.3.2_90405/
./VBoxLinuxAdditions.run
上記のユーザー名はログインしたユーザー名で置き換える 共有フォルダはvboxsfグループに属するので該当ユーザーを追加する。一度追加すればシステム更新後に再実行する必要はない。
gpasswd -a $1 vboxsf
スクリプトを使用してインストール
スクリプトのダウンロード
スクリプト a1.sh a2.sh a3.shをダウンロードし、実行権限を与える。chmod 777 *.sh
gcc等をインストール
./a1.shパッケージが更新されていれば再起動させる。
その他のパッケージを更新
./a2.shパッケージが更新されていれば再起動させる。
環境変数KERN_DIRを設定しVBOXASDDTIONSをインストールする
フォルダ /run/media/ユーザー名/ にVBOX・・・フォルダーがあるかどうか確認する。なければ下図 のとおり操作する。ただしCDの中身は実行しないこと。2013/11/16の記述では「先ほどのVBOX・・・フォルダー名とa3.shに記述されているフォルダー名を比較し違いがあればa3.shを修正する。」と記載していましたが、今回はスクリプトを修正してフォルダー名を自動に認識するようにしました。a3.shの`ls`はlsコマンドの実行結果を参照しなさいという意味です。`はshiftを押しながら@を押して入力します。
a3.shの引数にユーザー名を記述して実行。ユーザー名はVBOXASDDTIONSをマウントしたユーザー名である。
./a3.sh ユーザー名
a1.shのソース
yum -y install kernel-headers kernel-devel gcc
a2.shのソース
yum update
a3.shのソース
export KERN_DIR=/usr/src/kernels/`uname -r`

pushd /run/media/$1
cd `ls`

./VBoxLinuxAdditions.run

popd
a1~a4のダウンロード
a1.sha2.sh
a3.sh(2013/12/08修正)
a4.sh